|
Stop Pin Installation |
|
Stop Pin Installation |
Stop Pin installation instructions for Dreamscreen double doors
|
Tools Required:
The stop pins need to be installed prior to the Dreamscreen being mounted. Select the interior side of the door for stop pin use. In nearly every application, only a single set of pins is required.
|
| Step 1) Thread
the two white nylon screws into the holes of the long stop pins as
shown.
|
| Step 2) Remove the pan-head screw from the
center of the deep grooved end cap. Remove the small screw on the screen
side of the end cap (it holds the spline)
|
|
Step 3) Pull the plastic end cap straight out. On some older models, you may have to loosen the flat head screw through the magnet face near the cap
|
|
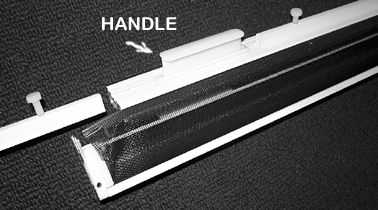
Step 4) Loosen the set screw on the Dreamscreen handle on the side of the door you are installing the stop pins and slide the handle out.
|
| Step 5) Slide the first stop pin into the pull rail
groove that the handle just slid out of, with the nylon screw end last.
Then slide the handle back in, followed by the second stop pin
(with the nylon screw first).
|
|
Step 6) Carefully replace the plastic end cap, threading the spline on the screen mesh into the cap as shown. Replace the screws from step 2. The larger screw (in the center of the plastic cap) should be tightened all the way, then backed off a half turn to allow slight play and make for even smoother operation.
|
|
Once the Dreamscreen doors have been installed, mount the keepers (included in the stop pin parts bag) to the top and bottom of the door frame. |